| Monday | 08:00 - 20:00 |
|---|---|
| Today | 08:00 - 20:00 |
| Wednesday | 08:00 - 20:00 |
| Thursday | 08:00 - 20:00 |
| Friday | 08:00 - 20:00 |
| Saturday | 09:00 - 13:00 |
| Sunday | Closed |
| Monday | 08:00 - 20:00 |
|---|---|
| Today | 08:00 - 20:00 |
| Wednesday | 08:00 - 20:00 |
| Thursday | 08:00 - 20:00 |
| Friday | 08:00 - 20:00 |
| Saturday | 09:00 - 13:00 |
| Sunday | Closed |
Managing your speed, gear, engine, and direction
Working upwards from the floor of your car, there are three types of control:
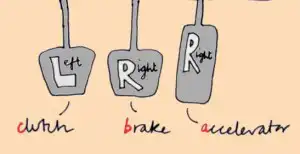
The foot controls or pedals are easily remembered by their initials A-B-C. Reading from right to left, they are: Accelerator • Brake • Clutch – An automatic car has no clutch.
The accelerator feeds petrol into the engine; it alters the speed of the car.
Use your right foot only.
Maintain a light touch. Press down or ease off in gentle stages. Imagine each movement up or down being just the thickness of a £1 coin.
The brake operates pads that press on all four wheels of the car; they slow the car down.
Use your right foot only.
Since your right foot operates the accelerator and the brake, you can never use both pedals at once. At any one time you will be pressing the accelerator or the brake, never both.
Red lights come on at the rear when you press the brake. Drivers of following vehicles can see that you are slowing down or stopping.
Unless it’s an emergency, maintain a gentle and finely controlled touch. Use progressive braking. That means light pressure at first, followed by firmer pressure in the middle part of the braking, followed by a gentle easing off as the car comes to a smooth, jerk-free stop.
The clutch connects and disconnects the driving wheels from the engine. The car can only drive when the clutch is connected (also known as engaged). Use the clutch when moving off, when changing gear, and when coming to a stop.
Use your left foot only.
The clutch is the only pedal operated by your left foot.
You can press your foot down soft or hard, but the technique for raising it must be precise. Lift your foot in gentle steps. Imagine each movement being about the thickness of a £1 coin.
The movement starts with the clutch disengaged. Raise your foot slowly till you reach what’s known as the bite point – the point where the two clutch plates begin to make contact. Bring the plates together extremely gently. Too fast and the car stalls. Once they’re engaged, lift your foot slowly off the pedal.
Clutch faults
To make sense of the gear stick, you need to know what the gears do.
Gears control the way the engine interacts with the driving wheels. Your choice of gear depends on the speed at which you are travelling and what you want the car to do.
Gear and speed range guide
(novice drivers only – experienced drivers know the right gear by the engine sound)
1st gear: 0–10 mph
2nd gear: 10–20 mph
3rd gear: 20–30 mph
4th gear: 30–40 mph
5th gear: 40+ mph
Use of the gears
You can only do certain things in certain gears. You cannot use 5th gear to move off, and you cannot drive at 60mph in 1st gear.
Moving off from a standing start takes a lot of power. That’s when you use the lower gears. As your car gathers speed, you change, step-by-step, into progressively higher gears for:
But if you move to a higher gear too early (i.e. to a gear that’s too high for the speed you’re doing), your car becomes less responsive. It feels slow to react when you press the accelerator. You should always feel some instant acceleration when you press your right foot.
The lower gears are also useful when you need a quick burst of speed for overtaking, and for climbing hills. Remember, the lower gears are more powerful.
Number and location of gears
Your car could have four, five, or six forward gears as well as neutral and reverse.
Get to know the layout of the gears in your car. You should never look down at the gear stick to hunt for your chosen gear.
You cannot move the gear stick when the clutch is engaged. Before you move it, press the clutch pedal all the way down. Then move the gear stick towards your chosen gear.
The gear stick is spring-loaded to return to the neutral in the centre of the cross-piece. You can judge the location of all other gears in relation to this central position.
Changing gear – the palming technique
To ease you into the right gear, use the ‘palming technique’. Wrap your hand around the knob of the gear stick as shown in the diagrams.
The parking brake locks the back wheels when the car is standing still. Because it locks the wheels tight, you should never use the parking brake when the car is moving. If you do, the car will skid.
Apply the parking brake when:
Use your left hand for the parking brake.
Parking brake faults
In each case the movements alternate in an easy rhythm. Before your hands go too far, switch from push to pull (or pull to push) to return them to the starting point.