Passing first time is about recognising when a risk starts to develop and clicking promptly, not clicking at every possible danger. The car hazard perception test has 14 video clips, with one clip containing two developing hazards; according to the DVSA, you can score up to 75 points and need at least 44 to pass. If you’re learning how to pass the hazard perception test first time, understanding the format and timing your response are the right place to start.
It’s normal to feel unsure about when to click, especially when a hazard develops gradually. Watch how the scene changes, and respond when a road user or situation begins to require action.
This guide explains what counts as a developing hazard, the risks you may see in clips and how scoring works. You’ll also learn what to expect during the test, so you can prepare with a clear plan and feel more confident on test day.
Key Takeaways
- Learn to click when a potential risk starts developing, rather than reacting to every possible danger.
- Watch how people and situations change in the scene to judge when a hazard may require you to act.
- Everyday road situations can feature in clips, so practise noticing how risks emerge around you.
- According to the Driver and Vehicle Standards Agency (DVSA), the car hazard perception test has 14 video clips, including one with two developing hazards.
- According to the Driver and Vehicle Standards Agency (DVSA), you can score up to 5 points for each developing hazard, making response timing important.
1. What is the hazard perception test?
The hazard perception test is the video section of the UK car theory test. You watch road scenes and click when a developing hazard starts to require a driver’s response. It tests whether you notice changing risks, not simply whether you recognise objects that could become dangerous.
If you’re learning how to pass the hazard perception test first time, focus on the change that makes a situation matter. A parked car, for example, may not affect your driving while it remains still. If it signals and starts moving into your path, you may need to slow down or change direction.
Each developing hazard has a scoring window. According to the DVSA, a response in the highest-scoring window earns 5 points. A later response can earn fewer points, while a click that’s too early or too late scores 0 for that hazard. The timing matters because the clip measures when you recognise that action may be needed.
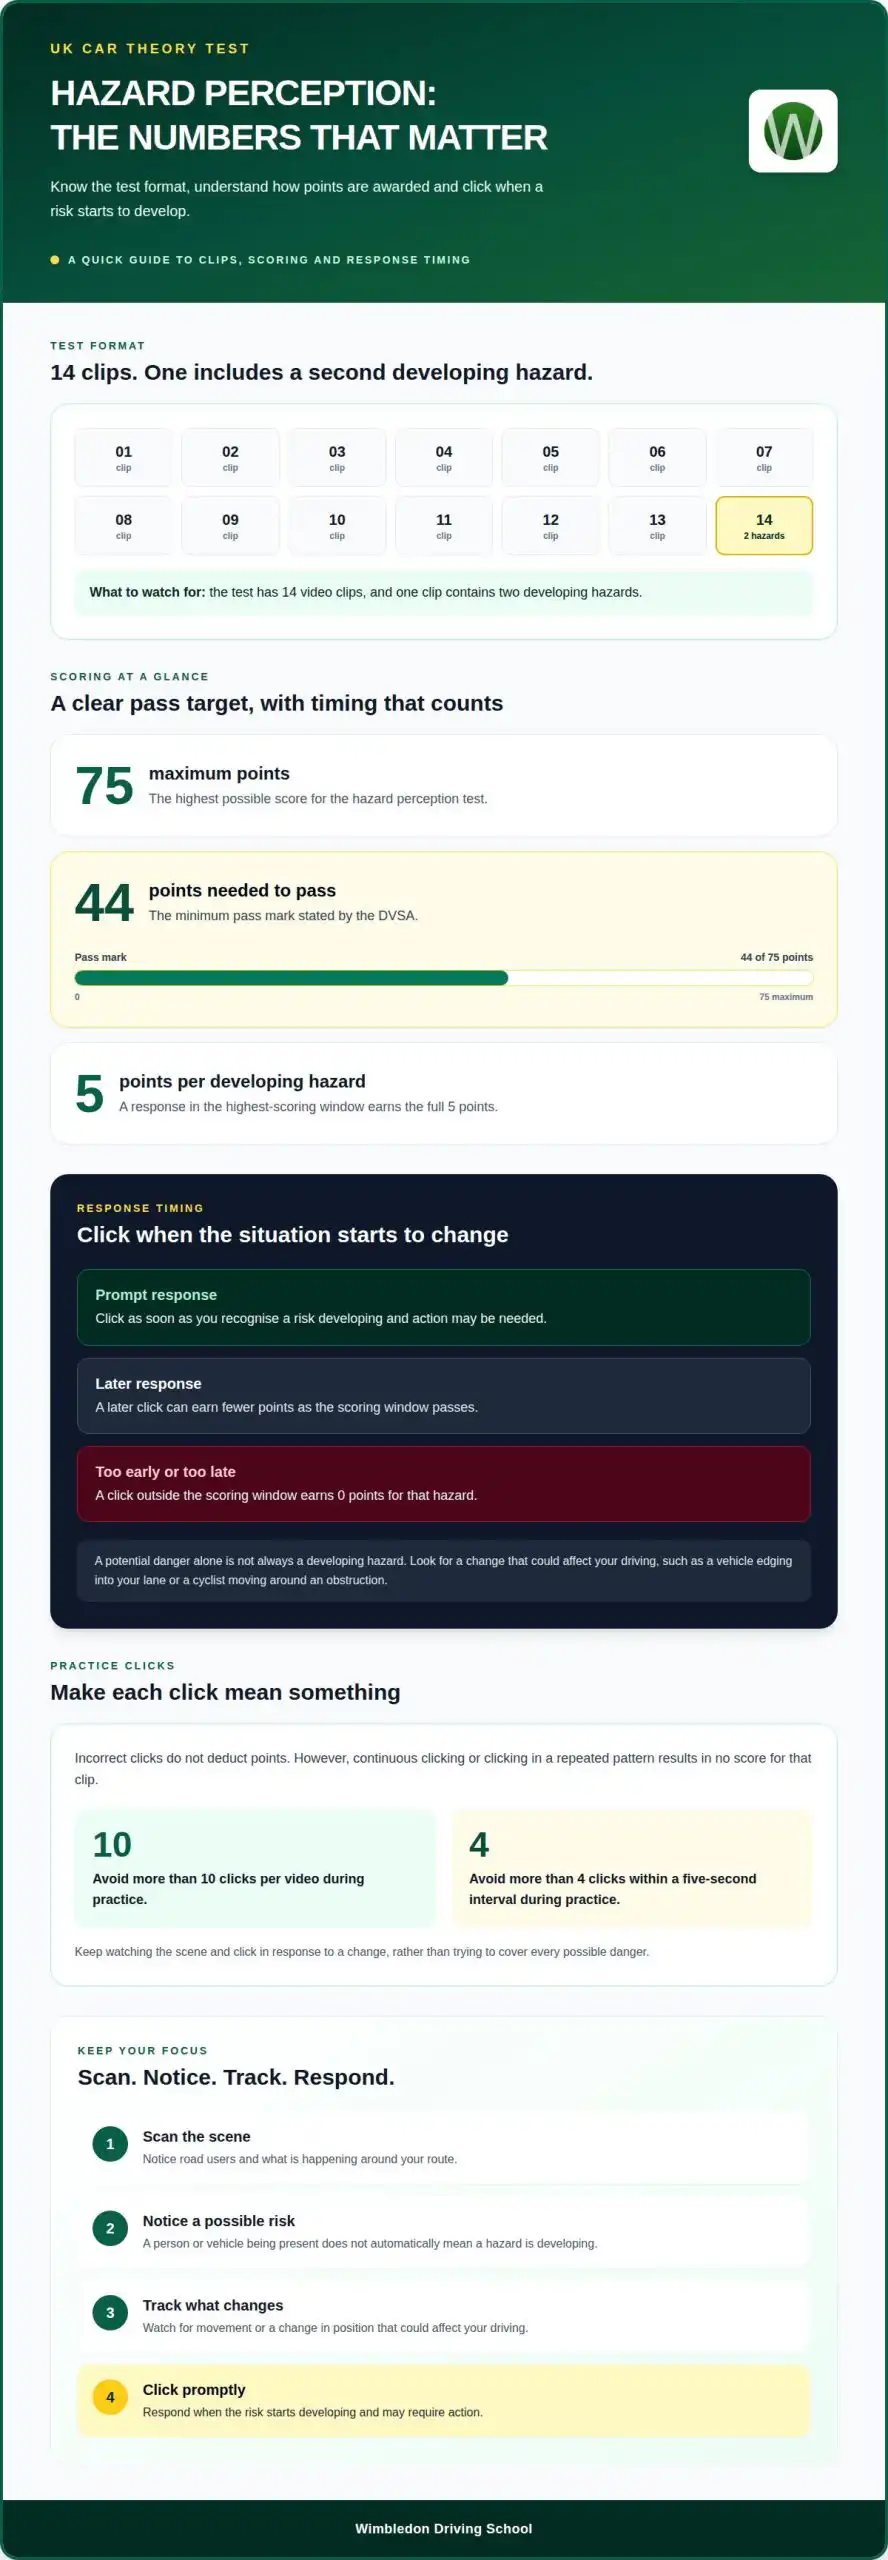
Clicking incorrectly doesn’t deduct points. However, continuous clicking or clicking in a repeated pattern results in no score for that clip. During practice, avoid more than 10 clicks per video or more than four clicks within a five-second interval. Keep your attention on the scene, and make each click reflect a change you’ve noticed.
Click too soon and the situation may not yet count as a developing hazard. Seeing a child on the pavement, for instance, doesn’t necessarily mean you need to respond. Watch for a change, such as the child moving towards the road, and consider whether it could affect your driving.
Click too late and the scoring window may have passed. Click when you first recognise a risk developing. If it continues to develop clearly, a second click after half a second can help cover a mistimed first response. Don’t click repeatedly just to cover every possibility.
To practise how to pass the hazard perception test first time, connect a visible change with a possible driving response. A vehicle edging out, traffic slowing or a cyclist moving around an obstruction can each change what you may need to do. Focus on watching the scene, not guessing what might happen.
If you pass the multiple-choice section but fail hazard perception, you haven’t passed the theory test overall. You’ll need to retake the theory test and pass both sections.
Candidates with disabilities or reading difficulties may be able to request adjustments for the theory test. GOV.UK explains the available support and how to request it. The appropriate options depend on your needs.
2. How hazards are defined and develop
According to the DVSA, a developing hazard is something that would cause a driver to take action, such as changing speed or direction. Development is the key: a situation becomes a hazard when it changes in a way that may affect your driving.
A potential hazard might become risky, but hasn’t developed yet. A cyclist ahead is one example. If they move out to avoid a parked vehicle, the situation changes and you may need to adjust your position or speed. Notice that change instead of reacting just because the cyclist is there.
Consider a junction. A vehicle waiting at a side road may remain stationary, so keep observing. If it starts moving towards your lane, its actions create a developing hazard. You may need to slow down or give it room. The important moment is the change that could prompt action, not the vehicle’s presence alone.
Road layout can also affect risk. On a narrow road, an approaching vehicle may initially pose little concern. If it moves towards the centre line as you approach a bend, the available space changes. Watch its path and consider whether you may need to adjust your speed or direction.
Use a simple sequence when watching a clip: scan the scene, notice a possible risk, then track what happens next. A bus stopped at a kerb isn’t automatically a developing hazard. Look for movement, a change in position or another road user entering your path before deciding that action may be needed.
Not every visible road user creates a developing hazard. A pedestrian standing well back from the kerb may not affect your driving. If they step towards the road as you approach, the situation changes. Judge their movement in relation to your route.
Describe the change in plain words, such as “the vehicle is edging out” or “the cyclist is moving around an obstruction”. This keeps your attention on what has changed, rather than just naming an object. On the road, the same observation helps you judge when your driving may need to adapt.
In the UK car hazard perception test, click as soon as you see a hazard starting to develop to score well. Wait until the situation begins to change, then click promptly. Don’t wait for the hazard to become more obvious if you’ve already seen it developing. Keep watching the scene and be ready to respond as a possible risk changes. The aim is to identify the start of the development, not to click just because a road user or potential hazard is present.
3. Common hazards in test clips
Hazard perception clips show everyday road scenes, with several road users and changing conditions. You might see traffic near a junction, a vehicle manoeuvring or pedestrians beside the kerb. Watch how the scene unfolds instead of searching for one obvious danger.
A vehicle waiting at a side road may pull into your path. Traffic ahead may brake, or a car may turn across your route. Notice the movement and consider whether it could require you to slow down, change direction or leave more space.
Other scenes may show cyclists passing parked vehicles, pedestrians crossing or cars emerging from entrances. A parked car alone may not affect your drive. If its door opens or it starts moving, the situation changes and you may need to respond.
Look beyond the nearest vehicle. At a junction, an approaching car could pose a risk while a pedestrian moves towards a crossing further ahead. Scan the whole scene, then focus on changes that could affect your path. This helps you spot more than one developing situation.
The clips use computer-generated imagery, or CGI, to depict road situations. CGI scenes let you practise observing varied traffic and road layouts. The DVSA had released 34 CGI hazard perception practice clips as of 2024. Official DVSA practice clips are available for learners to use.
Use each practice clip actively. First, watch the scene and identify possible risks. Then replay it and pinpoint what changed. For example, distinguish a stationary delivery van from the moment it starts moving away from the kerb.
After an attempt, review the order of events. Did traffic slow before a junction? Did a cyclist change course around an obstruction? Did a vehicle move after signalling? Tracking these details helps you connect early clues with the point when the scene may require a response.
Practise noticing patterns, not memorising a clip’s sequence. A pedestrian near a crossing may behave differently in another scene, and a turning vehicle could create a different risk depending on traffic. Use varied CGI clips to train your attention across the whole road scene.
During practice, describe each change in a few words, such as “the vehicle is pulling out” or “traffic is slowing”. Then consider how that movement affects the road ahead. This builds a clear link between observation and decision-making, ready for unfamiliar scenes on test day.
4. Format of the hazard perception test
According to the Driver and Vehicle Standards Agency (DVSA), the UK car hazard perception test presents 14 video clips. Each shows a road scene from the driver’s point of view. You watch the footage and respond as situations develop, so the format tests observation while events unfold, rather than recall after viewing.
One of the clips features 2 developing hazards, according to the DVSA. The other scenes focus on a single developing hazard. You won’t be told which clip contains the extra one, so keep watching each scene after responding. A second risk could arise somewhere else in the picture.
The videos are one minute long. The hazard perception section usually takes around 20 minutes, giving you a sequence of short scenes rather than one continuous drive. Treat every clip as a fresh situation: settle your attention at the start, scan the road, and follow changes until the footage ends.
You get one attempt at each clip. You can’t pause or restart a video, replay it, or review and change your responses during the test. You won’t be able to revisit a junction after the scene has moved on. Practise making decisions as you watch, then review your timing when the clip ends.
Before the hazard perception section begins, you may have a break of up to 3 minutes. Use this short pause to reset your focus and get ready for the next part. Avoid dwelling on earlier answers; each new video presents a separate road scene and a fresh opportunity to observe.
The test rewards attention across the whole screen. A risk might develop near the kerb while traffic moves ahead, or a vehicle might change course near a junction. Keep scanning between the road ahead and its edges. Don’t assume the most prominent object is the only relevant event.
Practise with clips that play through without interruption, so you become comfortable responding in real time. After each attempt, review the scene and identify where events changed. Build a repeatable routine: watch, notice movement, respond, then continue scanning instead of stopping your attention at the first click.
The videos remain 1 minute long; 13 of the 14 clips contain one hazard each, distinguishing these scenes from the clip with an extra developing hazard.
5. How does the UK hazard perception test work?
During each clip, you click when a developing hazard begins to need a driver’s response. The Driver and Vehicle Standards Agency (DVSA) says candidates can score up to 5 points for each developing hazard. Your score depends on when your response falls within that hazard’s scoring window.
Respond promptly when a risk starts to develop, rather than waiting until it becomes obvious. For example, a vehicle edging out from a side road may begin affecting your route before it enters your lane. A timely click can score more than one made after the situation has progressed.
Scores reduce as your click moves later through the scoring window. A response at the highest-scoring point earns 5 points; a slightly later response earns 4. Further into the development, the response can earn 3, then 2, and finally 1 point at the last scoring opportunity. Clicking outside the window earns no points.
The UK hazard perception test has a pass mark of at least 44 points out of 75, according to the Driver and Vehicle Standards Agency (DVSA). Treat that threshold as a target, not a reason to ignore individual clips. Each developing hazard gives you another opportunity to build your total through accurate observation.
Each clip contains at least one developing hazard, and the section includes 15 hazards in total. One clip contains two, so continue watching after clicking once. A pedestrian stepping towards the road after a vehicle pulls away, for instance, could create another separate situation requiring your attention.
There’s no penalty for an incorrect click, but clicking continuously or in a repeated pattern can trigger the anti-cheating system and result in no score for that clip. Tie clicks to visible changes. During practice, avoid rapid bursts and don’t tap repeatedly to cover every possibility.
After each practice clip, replay it and pinpoint when the situation began to require action. Compare that moment with your response: was the vehicle still stationary, or had it started moving? This review helps you spot the change earlier next time, rather than memorising one clip’s sequence.
Hazard perception is part of your car theory test, so you need to pass this section as well as the multiple-choice section. Practise focused observation, measured clicks and continued scanning throughout every clip. This gives each developing hazard your attention.
Wimbledon Driving School: Pass Plus Courses
Wimbledon Driving School offers Pass Plus Courses after you’ve passed your practical test. Hazard perception skills remain useful beyond the theory test: watching road users, spotting changes and anticipating when you may need to act all support safer driving.
If you’re preparing for your practical test, a Mock Driving Test can help you practise responding to real-road situations. Manual Driving Lessons and Automatic Driving Lessons also give you the chance to build observation skills with an instructor before test day.
After passing, consider whether a Pass Plus Course suits your goals for further learning. Contact Wimbledon Driving School to discuss your next step.
Build observation into your next drive
The hazard perception test also lets you strengthen a skill you’ll use on real roads. Keep practising how to notice movement, judge changing situations and decide when your driving needs to adapt. These habits help you respond thoughtfully beyond the test screen, reflecting the proactive approach taught in driver education programmes like 10A Driving School Silver Spring.
If you’re learning how to pass the hazard perception test first time, connect your clip practice with what you observe during lessons. Notice how traffic behaves around junctions, parked vehicles and pedestrians, then consider what might require you to slow down or change position.
Wimbledon Driving School offers Manual Driving Lessons, Automatic Driving Lessons and Intensive Driving Courses to support your practical learning. Choose the lesson type that suits your needs and build observation skills as part of your wider driving journey in South West London, South East London, Surrey or Middlesex.
Stay observant, practise with purpose and take your next step with confidence.
Frequently Asked Questions
What is the hazard perception test?
It’s the video section of the car theory test, where you identify developing hazards by clicking as road situations change. For example, a vehicle signalling at a junction may become relevant when it starts turning across your route. The test assesses whether you notice when a situation could affect your driving, not whether you click simply because a road user or obstacle appears on screen.
What happens if you click too much?
Clicking continuously or in a repeated pattern can trigger the anti-cheating system, leaving you with no score for that clip. You don’t lose points for an incorrect click, but excessive clicking can still cost you the clip’s score. For practice, aim for deliberate responses and avoid more than 10 clicks per video or more than four clicks within a five-second interval.
How is the hazard perception test scored and what is the pass mark?
The Driver and Vehicle Standards Agency (DVSA) says you can score up to 5 points for each developing hazard. Your score depends on when you click within the scoring window, with earlier valid responses earning more. The pass mark is at least 44 points out of 75, according to the DVSA. Keep watching after each click, as another hazard may still appear.
What mistakes cause candidates to score zero on a hazard perception clip?
A click can score zero if it falls outside the scoring window, comes too early or arrives after the window closes. Continuous clicking or a repeated pattern can also activate the anti-cheating system, resulting in no score for that clip. For instance, clicking as soon as you see a parked car may be premature if nothing has changed to affect your route.
How can I spot developing hazards early without clicking too soon?
Watch for changes in movement, direction or available space instead of reacting to every possible risk. A pedestrian near a crossing may not yet affect your path; stepping onto it as you approach changes the situation. Practise describing the change to yourself, such as “the car is pulling out”, then click when that movement could require you to adjust speed or direction.
What are the best ways to practise for the hazard perception test?
Use practice clips to train your attention, then review the exact moment each situation starts to develop. Mix clips with theory questions in focused daily sessions of 15-30 minutes. After a clip, explain why a risk mattered and what changed, rather than memorising its sequence. This helps you apply the same observation to unfamiliar scenes and real driving situations.
Disclaimer
This article is provided for general informational purposes only and does not constitute professional driving, legal, or safety advice. While we aim to keep our content accurate and up to date, rules, prices, and DVSA test requirements can change — always check gov.uk or contact us directly at 020 3524 7968 for the latest guidance before making any decisions. Nothing in this article guarantees a specific outcome, including passing your driving test within any stated timeframe. For current pricing, course availability, and instructor details, please visit our Prices page or get in touch.